|
an automated melodica
|
|
<Melauton>
Melo & Mela Godfried-Willem RAES 1999/2007/2017/2022 |
|
an automated melodica
|
|
<Melauton>
Melo & Mela Godfried-Willem RAES 1999/2007/2017/2022 |
<Melauton>
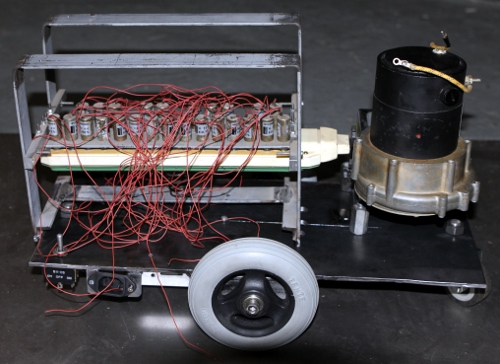
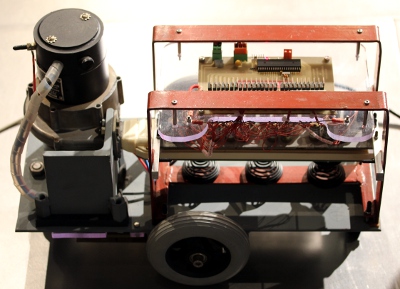
In 1998 we decided to add an automated melodica to what was
at that time our barrelorganproject, as a little add-on. This robotic instrument
uses an existing and very common Hohner two octave melodica as sound source.
These melodicas were quite popular in the sixtees. Either the soprano or the
alto model could be used as they have the same sizes. The first construction
we started up uses the soprano instrument (green), but we considered to build
another copy using the alto instrument (red). This would then lead to the couple
to be baptised Melo and Mela. 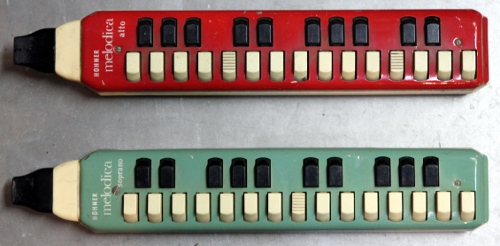 All
keys as well as the top cover were removed and trashed. The 25 open holes that
became now accessible are covered with a layer of soft leather wherein the tone
holes are punched.
All
keys as well as the top cover were removed and trashed. The 25 open holes that
became now accessible are covered with a layer of soft leather wherein the tone
holes are punched. 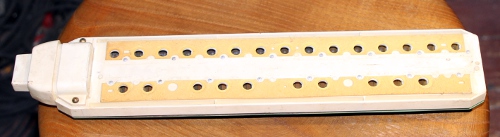 Thus
the solenoid valves did not have to hold air tightening pads nor felts. Providing
them with 10 mm round steel washers was ample. Since the holes are only 8 mm
in diameter and pretty close to each other, we had to use very small solenoid
valves. We found a bunch of tiny 12 V valves with 5 mm anchors made by Binder.
The movement excursion of this type is limited to 5 mm, just enough for this
application.
Thus
the solenoid valves did not have to hold air tightening pads nor felts. Providing
them with 10 mm round steel washers was ample. Since the holes are only 8 mm
in diameter and pretty close to each other, we had to use very small solenoid
valves. We found a bunch of tiny 12 V valves with 5 mm anchors made by Binder.
The movement excursion of this type is limited to 5 mm, just enough for this
application.
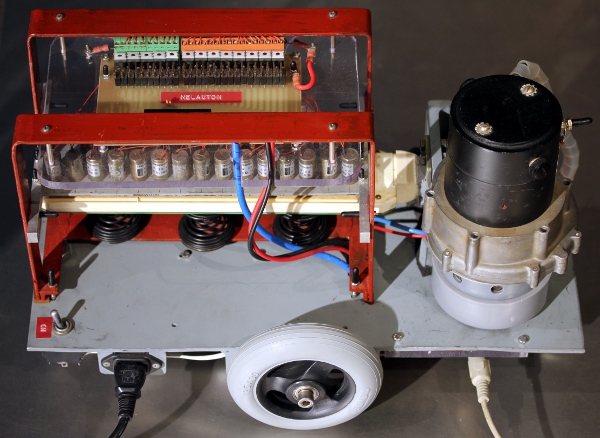
The valves were mounted on a welded regular steel frame. Upside
down in this picture: 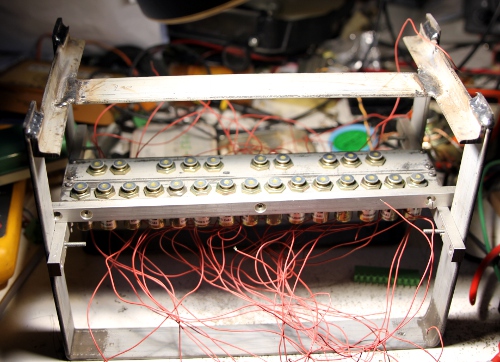
In a first build, in 1999, the wind was provided by a small radial compressor from an airplane, working on 3 phase 400 Hz current. So we had to make our power supply, with the advantage that we could controll the operational frequency and therewith the windpressure easily. Unfortunately, the motor caused too much noise to be acceptable in a musical instrument. This motor was later used for the storm wind mechanism in our <Thunderwood> robot. So we redesigned the wind supply and came up with a classical bellows construction driven by a bipolar solenoid. That design however came out way too large and completely out of proportion with the size of the instrument... Also, keeping the wind pressure more or less stable, was problematic. However, this automaton could be made pretty small although most space was occupied by the bellows. In 2017, when taking up the project again, we decided to use a small radial compressor. This is pretty noisy, but the control has a lot of flexibility. A special silencer was designed for the wind inlet, but we could not reduce the noise to satisfactory levels. Ample place for future improvement...
As a controller we first used a Pavo controller kit, such that
the instrument can be operated as an acoustical midi synthesizer module. Since
the instrument has only 25 notes, we mapped some other notes to expression controls.
Herewith the wind pressure could be controlled easily. However, with the redesign
in 2007, we replaced the quite primitive Pavo circuitry with a PIC microcontroller
board of our own design. In the 2017 version, the PIC controller was preserved
allthough we redesigned the PCB. The principle of the valve control circuit
became: 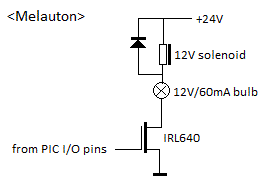 The
bulb in the circuit is not a visual feature but serves as a voltage dependent
resistor, as the difference between its cold and hot resistance is about 1 on
10. The same trick was applied earlier -with different bulbs, voltages and components-
in our <Autosax> robot, the very oldest member of the Logos robot orchestra.
The complete circuit looks like this:
The
bulb in the circuit is not a visual feature but serves as a voltage dependent
resistor, as the difference between its cold and hot resistance is about 1 on
10. The same trick was applied earlier -with different bulbs, voltages and components-
in our <Autosax> robot, the very oldest member of the Logos robot orchestra.
The complete circuit looks like this: 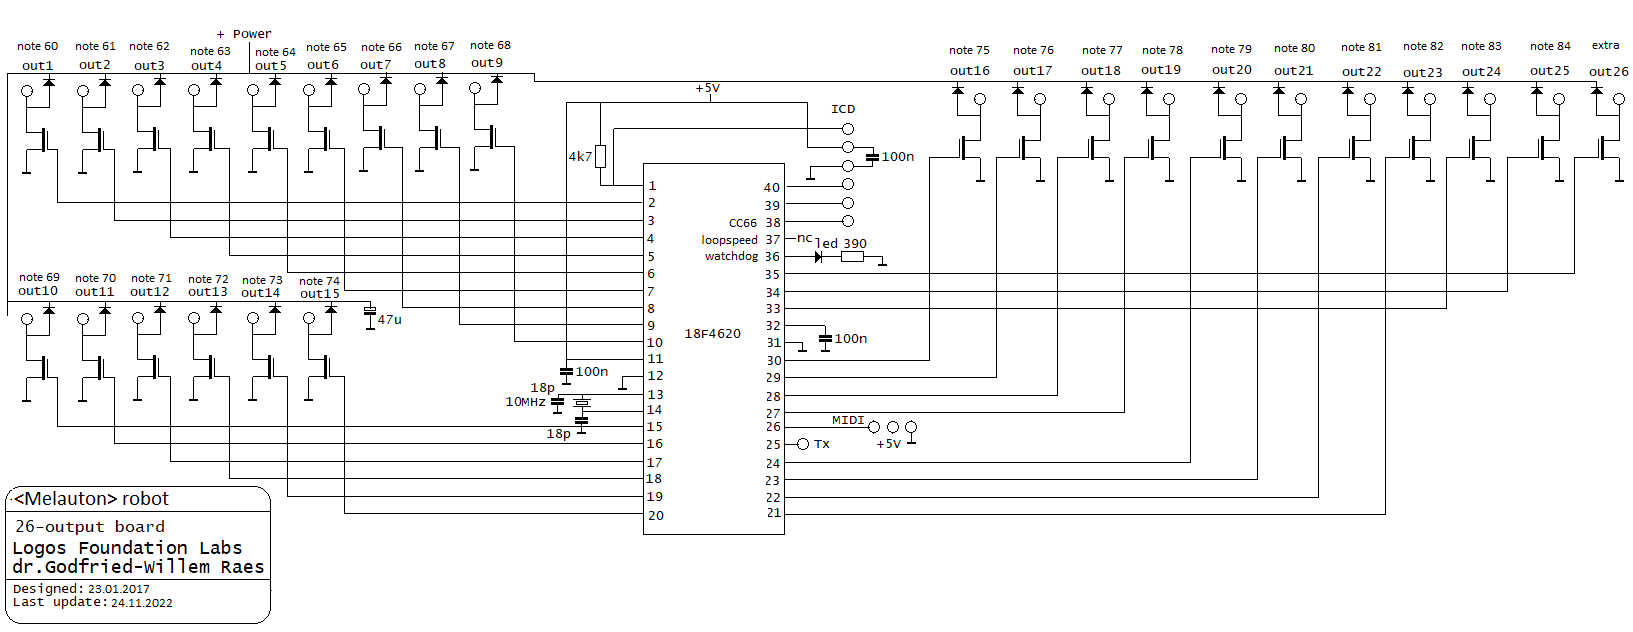
The midi I/O section of the circuit uses differential drivers such that very
long cables can be used: 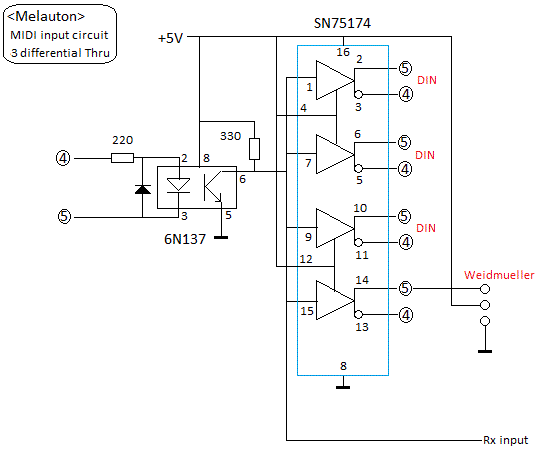
The wind control for the motor takes into account the pitch as well as the number of notes to be sounded, combined with a global setting for the volume control. Note that the lowest note requires about four times more air than the highest note, two octaves higher. When no notes are sounded, the motor will switch off automatically. A freescale air pressure sensor is used to control the required pressure in a PID regulator arrangement. Operation of the motor can be controlled with controllers #7 and #68, #69 and #70, as documented below. The prefered setting for controller 68 is 9. With this setting, the sensor has no function at all and thus the algoritm implemented relies purely on measurements and tests performed on the actual robot.
Midi implementation:
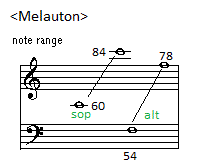
Mapping: notes 60 - 84: real notes (for Melo, for Mela, it would be 54 to 78 transposed two octaves down, such that both instruments can share a same midi channel). At the time of this writing, Mela is not yet made.
Note on , note off , velocity is not implemented.
Controllers:
#7: Wind pressure controller. The wind pressure is a direct function of the
sound level.
#66: power on/off. Power off resets all controllers to their default cold boot settings.
#68: Motor operation mode:
#69: Minimum motorspeed on standby mode. Default value: 80.
#70: Scaling factor in use when ctrl.68 is set to value 9. This steers the regulation
depth used in compensation of the number of notes playing.
#71: Wait time before motor standby after note-off. Motor will run at the speed
set with #69. Default setting = 10, corresponding to 1 second.
#72: Wait time before motor complete turn off. Default setting = 50, corresponding
to 5 seconds.
#82: Radar interface on/off controller
#123: All notes off, preserving settings of other controllers.
Note pressure, Aftertouch, Pitch bend and sys-ex are not implemented.
Technical specifications:
Collaborators on the construction of this robot:
Criticism and evaluation:
Music composed for this robot:
 |
Back to Main Logos page:index.html | To Godfried-Willem Raes personal homepage... | To Instrument catalogue | Composers Manual to the Logos Robot orchestra |
<Melauton> 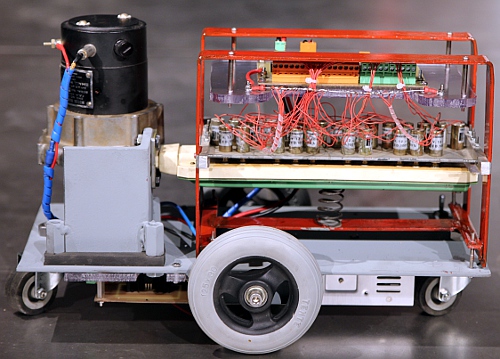
Voor de bouw van deze automaat ging ik in 1998 uit van een bestaande Hohner
melodika. Zowel het sopraan als het alt model bleek bruikbaar: Het
was bedoeld als negende module in het toenmalige 'barrelorgan' projekt. Een
(zeldzaam) basmodel hadden we eveneens verzameld, maar daaraan was heel wat
restauratiewerk en bovendien vergt dit instrument een alternerende blaas- en
zuigwind. De bas werd uiteindelijk niet gebruikt. De toetsen en het bovendeksel
van de sopraan en alt melodika werden verwijderd en weggegooid. Zo kwamen de
toongaten, omringd met een zeemleren dichtingslaag binnen bereik.
De toongaten zijn 8 mm groot en gezien ze vrij dicht bijeen liggen, moesten
we erg kleine elektromagneten gebruiken. We vonden een lot 12V spoeltjes -merk
Binder- met ankers van 5 mm, die we voorzagen van dichtingschijven in staal
van 10mm diameter. Luchtdichting op de ankers hoefden we -gezien de konstruktie
van de melodika- niet extra te voorzien..
Het toonbereik van deze automaat in de sopraan versie (Melo) is 2 oktaven:
midi noten 60 tot 84. Voor de sturing maakten we in de oorspronkelijke versie
gebruik van een eenvoudige microprocessor uit de Pavo reeks. Gezien de gebruikte
spoeltjes genoeg hebben aan 12 Volt bij een stroom van 60 mA, konden we kleine
power mosfets gebruiken voor de aansturing. Wanneer we de verdere afwerking
weer opnamen in 2017 beslisten we toch een geheel nieuw PCB te ontwerpen gebruik
makend van een 40-pins PIC microcontroller.
Ook bleek de dichting middels zeemleer toch niet helemaal lekvrij en goed te
werken.
Voor de windvoorziening maakten we aanvankelijk gebruik van een kleine axiale kompressor uit een vliegtuig. Deze motor draaide op driefazige stroom met een frekwentie van 400 Hz. Zoals voor andere machines, wekten we deze toch niet alledaagse wisselstroom op met een eigen schakeling gebruik makend van een BS2 basic stamp van Paralax. Het resultaat was evenwel een duidelijk hoorbare toon veroorzaakt door de motorwikkelingen en de ermee verbonden schoepen. Daarom ontwierpen we in 2007 een nieuwe windvoorziening, gebruik makend van balgen aangestuurd door een bipolaire elektromagneet. De bekrachtiging van deze elektromagneet kon met PWM worden geregeld, waardoor de winddruk geregeld wordt. Hierdoor was het instrument voorzien van een mogelijkheid tot globale expressieve kontrole. Luchtdrukvariaties zijn voor een melodika immers van invloed op zowel klankkleur als op luidheid. Toonhoogtevariatie laat het melodika mechanisme (doorslaande tongen) niet toe. In 2010 verlieten we dit opzet omdat het behept was met storingen en mechanische bijgeluiden.
Een beetje als grap bouwden we deze hele automaat aanvankelijk zo dat hij in een 19" rack paste. Als een heuse akoestische midi synth dus. Bij de ombouw, een eerste keer begonnen in 2007, viel een en ander echter toch wat groter uit, alhoewel we hem ook toen nooit een volledige afwerking gunden. De konstruktie met de balgen bleek niet erg betrouwbaar en was bovendien behept met vele mechanische bijgeluiden. Toen we in 2017 helemaal zonder financiele steun kwamen te staan, haalden we het instrument vanonder het stof en beslisten we het alsnog af te werken. Met iets meer aandacht voor de vizuele vormgeving deze keer. De konstruktie met de dubbele balg lieten we geheel weg wegens veel te groot, en werd vervangen door een kleine radiale kompressor aangedreven door een universele kollektormotor. Deze motor van Amerikaanse makelijk -wellicht afkomstig uit een vrachtwagen- maakt meer lawaai dan wenselijk en mogelijk is, maar deze robot werd afgewerkt op het moment dat we helemaal zonder steun en subsidie kwamen te vallen waardoor we ons geen betere motor meer konden veroorloven. Alles diende te worden uitgevoerd met onderdelen die we nog op voorraad hadden of konden recycleren. Vandaar dat we voor de motor besturing een board recycleerden dat we oorspronkelijk hadden ontworpen voor de Propeller-1 robot in het Balmec projekt. In een verre toekomst kan altijd nog een kleine en stille radiale kompressor toegepast worden...
|
|
Terug naar Logos' index-pagina: | Naar Godfried-Willem Raes personal homepage... | Naar katalogus instrumenten | Composers Manual to the Logos Robot orchestra |
Construction diary:
1998: Collecting old Hohner melodica's. Sofar we got 2 soprano's, 2 alto's
and one bass melodica. The bass model needs quite some repair work.
1999: First assembly. Welding of a holding structure. Dismantling of a Hohner
soprano melodica. Construction of the solenoid assembly. (12V solenoids, pull-type).
Washers glued on the ends of the anchors with epoxy compound. Pavo controller
board assembled, driver board soldered. 19" rack enclosure finished.
2007: Pavo circuitry removed again and replaced with more flexible PIC controller boards. Bellows constructed from leather and wood. The intention is to drive them with a large Laukhuff bidirectional solenoid.
21.01.2017: Experiments carried out with a collector motor driven radial compressor.
Silencing would be the main problem here. The wind pressure however is perfectly
o.k. for this kind of instrument.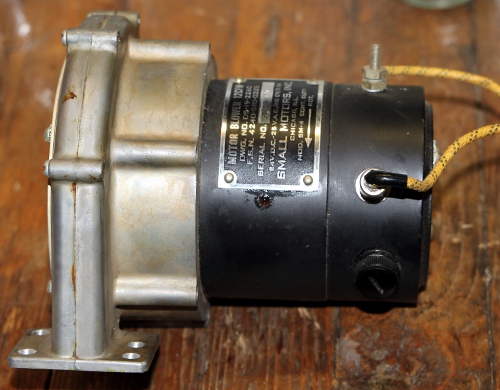 A PID based wind pressure controller should be implemented. We can use a Freescale
wind pressure sensor here, similar to what we did for <Bako>.
A PID based wind pressure controller should be implemented. We can use a Freescale
wind pressure sensor here, similar to what we did for <Bako>.
22.01.2017: Design of a sturdy mounting flange for the motor. The rectangular mouth on the flange fits the inlet of the melodica quite well.
23.01.2017: Design of a new controller board with 26 mosfet outputs.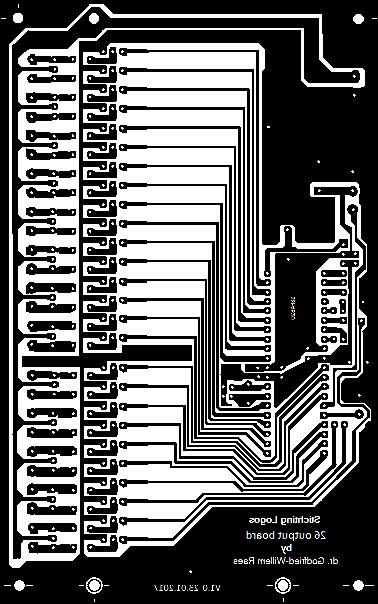 Note that for simplicity of the circuit, we use 12 V tungsten filament bulbs
in series with the solenoids. They work as voltage dependent resistors, since
their cold resistance value is 22.8 Ohms, rising to 200 Ohms when lit. Thus
the switch-on current through the coils will be 115 mA (and 21.4 V) whereas
the steady current drops to 62 mA (and 11.56 V) within ca. 10 ms. All this,
of course, with a power supply voltage of 24 V. This power supply should rated
for 40 Watt minimum. If we power the motor from the same power supply, it should
be rated for 120 W (5 A).
Note that for simplicity of the circuit, we use 12 V tungsten filament bulbs
in series with the solenoids. They work as voltage dependent resistors, since
their cold resistance value is 22.8 Ohms, rising to 200 Ohms when lit. Thus
the switch-on current through the coils will be 115 mA (and 21.4 V) whereas
the steady current drops to 62 mA (and 11.56 V) within ca. 10 ms. All this,
of course, with a power supply voltage of 24 V. This power supply should rated
for 40 Watt minimum. If we power the motor from the same power supply, it should
be rated for 120 W (5 A).
24.01.2017: Construction of the L-shaped mounting flange for the motor. To stay
in style with the original design -and also to save money- we use regular construction
steel. First designs for silencers to be placed on the sucking side of the compressor.
As it turns out, we can reuse one of the boards we made for Propeller 1 in the
Balmec project with minor modifications. Here is the circuit: 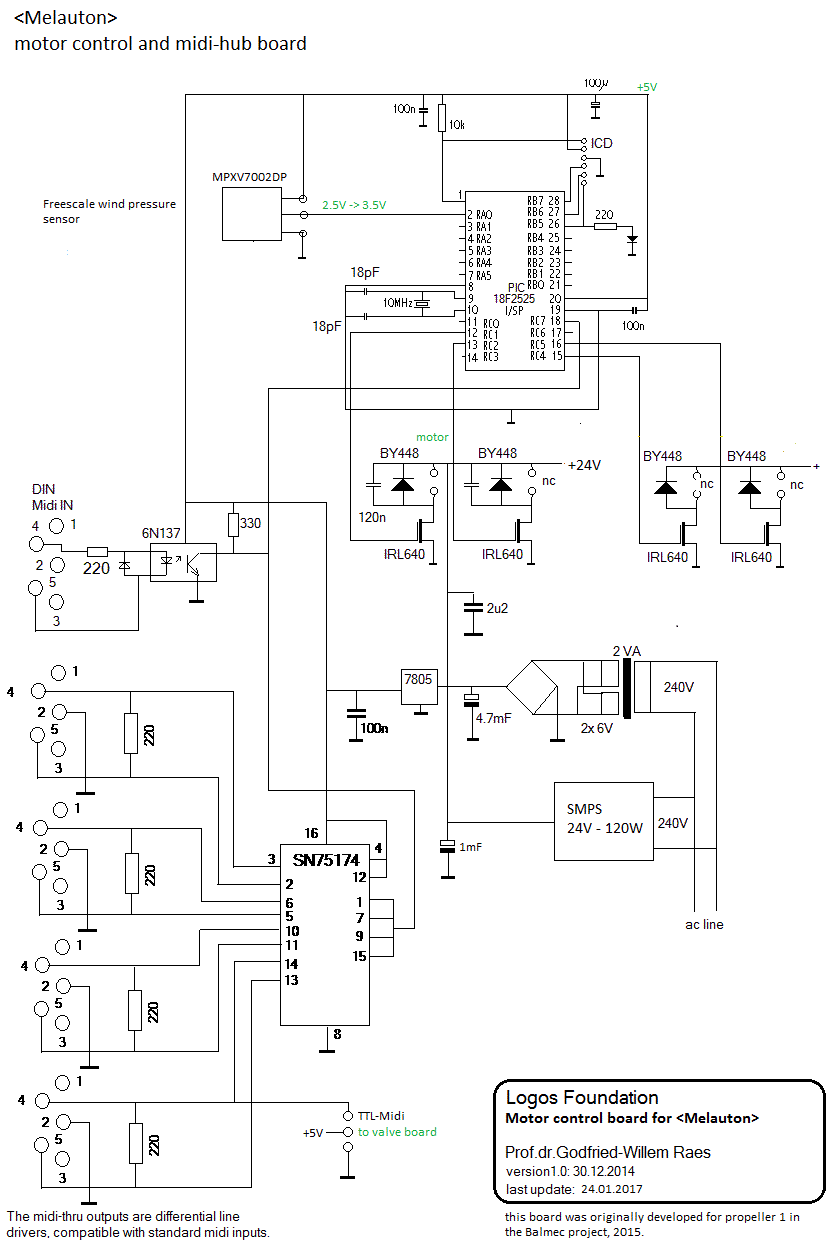 And here is the PC designed and soldered for it:
 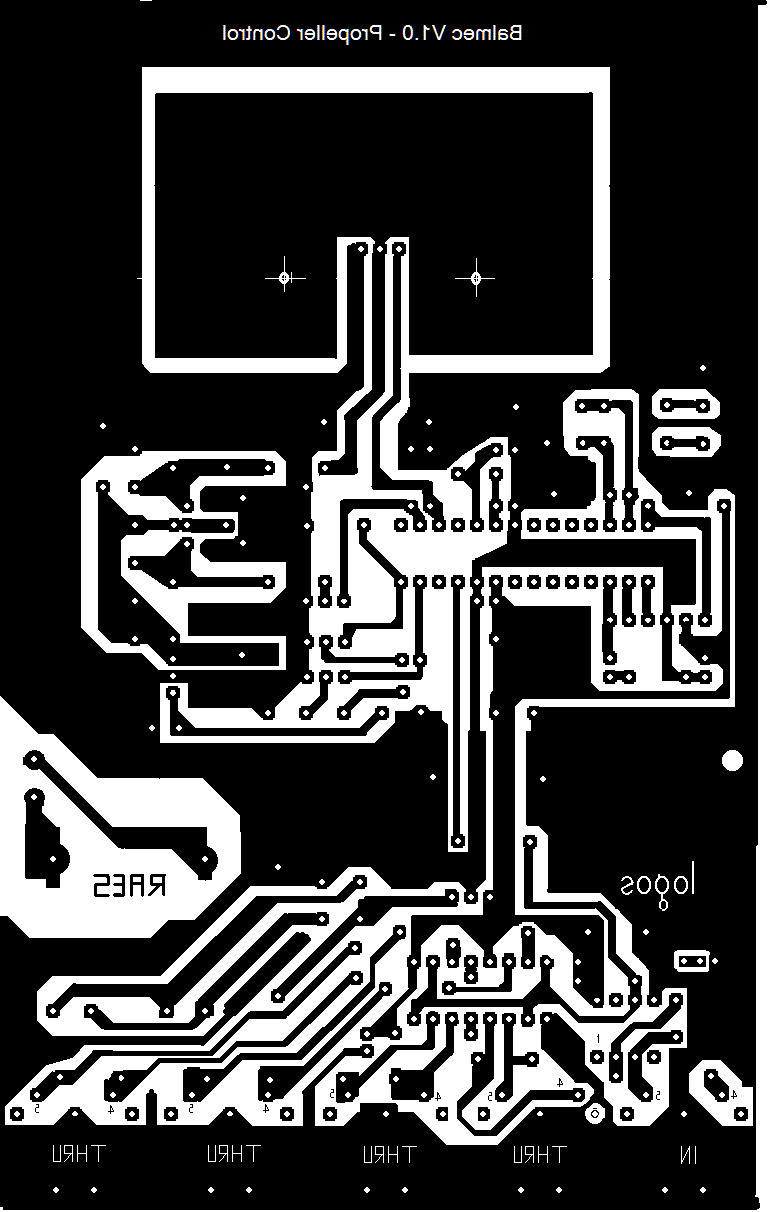 The
soldered, tested and finished board looks like this:
The
soldered, tested and finished board looks like this: 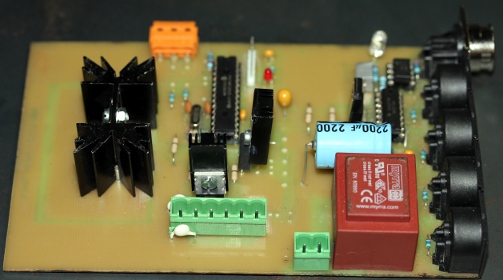
25.01.2017: First sketch for the motor control firmware. For the wind pressure
sensor, the Freescale MPXV7002DP looks like a good choice. The range is from
-2 kPA to +2 kPa. In organ builder terms, this corresponds to 203mm H2O, or
20.38 mBar. The output voltage for no differential pressure is 2.5V. The scaling
is 1V/kPa. If we estimate the practical pressure range for this instrument at
between 0 and 500 Pa, we have a voltage differential range of only 500 mV. As
the ADC converters in the microcontroller have only 10 bit resolution, this
leaves us with a resolution of just over 6 bits. Here
is the datasheet for the pressure transducer.
26.01.2017: Welding of three high nuts in the L shaped flange for the motor,
such that height adjustment, using M10 bolts, becomes possible. 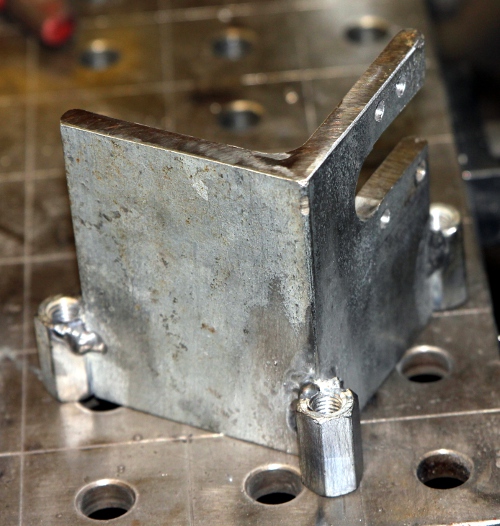 Base
plate cut out from a piece of 5 mm thick regular construction steel. Design
of the base plate and wheel positions.
Base
plate cut out from a piece of 5 mm thick regular construction steel. Design
of the base plate and wheel positions.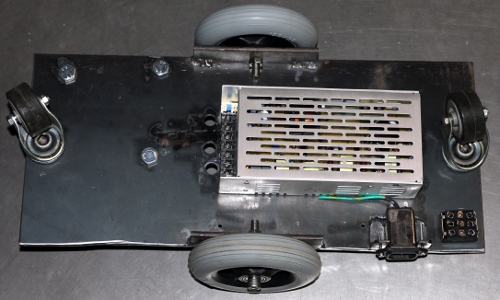 Design of a muffler for the compressor suction side. Welding and construction
of mounting brackets for the IEC power connector. The power switch will be on
the upperplate. Wheel mounting plates made and welded on the chassis bottom
plate. Some minor adjustments with the placing of components seem required.
First tentative mounting of components:
Design of a muffler for the compressor suction side. Welding and construction
of mounting brackets for the IEC power connector. The power switch will be on
the upperplate. Wheel mounting plates made and welded on the chassis bottom
plate. Some minor adjustments with the placing of components seem required.
First tentative mounting of components: 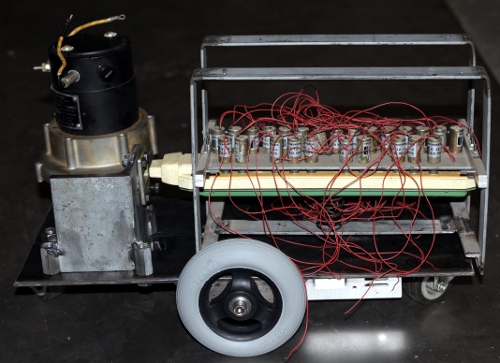
27.01.2017: Version 1.0 written for the firmware of the 25-solenoid board, using
the Proton+ compiler. 26-output board etched and drilled for Melauton. Test
code written and added in GMT, with complete implementation of this robot. Board
populated and tested with the new firmware. Placement in the robot can start...
28.01.2017: Sawing and drilling of a polycarbonate carrier plate 200 x 130 mm
for mounting the motor control board on the underside. Drilling of mounting
holes for 4 M4x40 inbus bolts to mount the instrument part to the chassis. Chassis
and motor mount sprayed with grey galvanising paint. Definitive mounting of
the power inlet (IEC), switch and power supply. Wiring of the underside can
take off from now.
29.01.2017: Start wiring power supply and motor control board. First electric
testing passed. No shorts. Polycarbonate carrier for the soldenoid driver board
sawn out. By the end of the day, we got everything, including the solenoids,
wired up... Finished the working day by painting the hold structure for the
melodica in red. As we used regular construction steel for this small robot,
painting is a requirement. The paint takes 24h to dry...
30.01.2017: Further wiring and assembly. Hindered a lot by the low temperatures
in the workshop... the red paint applied yesterday is not drying. Sturdy M3
connections added on the 26-output board for the common +24V power line. When
firing it all up, the 24V power supply shows up a big short. Some measurements
immediately revealed the cause: the compressor motor has its positive pole grounded!
As a consequence, we have to find a way to mount it with complete electric insulation
from the chassis... Either we have to find strong plastic M10 bolts, or we have
to use insulating busses around the M10 bolts. We finaly made flanged washers
in nylon and enlarged the mounting holes to 13 mm.
31.01.2017: After fixes yesterday, we still seem to have another short on the
+24V lines, now to be located on the solenoid board... Bug found: wrong poling
on 24V power connector. Spiral springs mounted on all solenoid anchors, as fall
back on gravity alone doesn't lead to good results. All valves are working now,
and the melodica can play its first scales. There are still problems with the
motor control though. Also the muffler will be absolutely required, as the motor
is way too noisy.
02.02.2017: Further coding for the PID regulation for the motor. Controllers
added for testing different modes of operation. Looks like our assumption -based
on measurement and experience in building the <HarmO> robot- that the
wind consumption goes inversed quadratic with the pitch does not fully hold
here. This has to be further examinated, but it could very well be a property
of the melodica design by Hohner.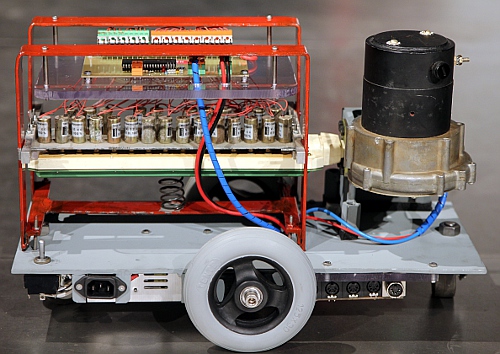
03.02.2017: Construction of a muffler for the compressor: outer cilinder made
from 60 mm high piece of 90 mm diameter grey PVC tube. This cilinder is closed
at the underside with a PVC cap and perforated on its circumference with 8 holes,
10 mm in diameter. The inside aspiration tube is 50 mm in diameter. The entire
construction is filled with insulating foam.
04.02.2017: Complete disassembly of the robot in order to make the frame 5 mm
lower. We rewelded the underside of the frame (thus repainting will become mandatory).
All notes except 60 are playing now. Somewhere, the pallet must be stuck although
we cannot visually see a problem. New test coded added to the appropriate module
in GMT: tests for note repetitions and polyphonic chords up to full clusters.
Springs pushing the melodica agains the solenoid assembly replaced with egg-holder
springs. This works well and looks great.
05.02.2017: Further development of the firmware. Note 60 finally working: something
got stuck in the bore of the solenoid preventing the anchor from being lifted
up..
06.02.2017: Loctite 5699 sealing silicon applied to the connection between melodica
and compressor.. Start algorithmic composition of a demo piece for this robot:
'Melo's Melodrama'....
19.02.2017: MP3 files added to this page.An
anomymus choral, arranged by Xavier Verhelst and a demo
piece by Kristof Lauwers.
01.02.2022: <Melauton> considered for an exhibition at the Academy of
fine Arts in Tielt. Philippe Druez tries to develop a microprocessor systems
with a sensor to make autonomous operation possible.
04.02.2022: Development of <Melauton> as a stand alone robot abandonned
for now. The newly build <Steely> robot will be sent to Tielt instead.
06.02.2022: Considering to replace the compressor with a mini Ventola from August
Laukhuff.
14.02.2022: A radar interface to turn Melauton into an autonomous robot is up
and running: Radar 6.: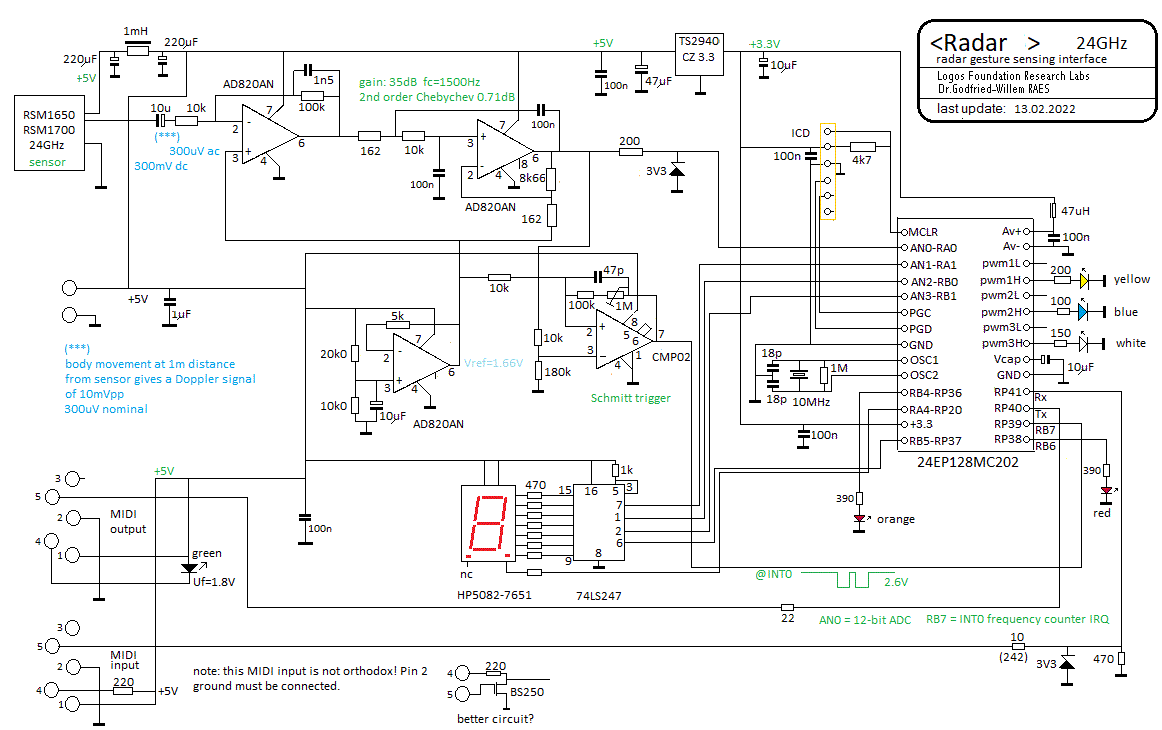
22.11.2022: Melauton project re-evaluated and tested. In fact, the rather painfull
sound with all the motor noise, can also considered to be an expressive bonus
to this robot... Maybe we should just leave this 'vacuum cleaner' motor in place,
rather than improve it.
23.11.2022: Recoding the 18F2525 PIC used for motor control. Some features added:
controller 69 introduced to set a minimum motorspeed.
24.11.2022: Coding for the valves PIC also upgraded. Documentation brought inline
with the changes.
25.11.2022: Firmware upgraded. Now we have implemented timers to automatically
switch off the motor, when no notes are sounding. GMT testcode upgraded.
26.11.2022: Controllers 71 and 72 added for steering the wait time before motor
shut-down. Testcode updated accordingly. New firmware uploaded.
30.11.2022: Some new pictures made to document Melauton.
To do:
Maintenance notes and parts specifications:
Radial compressor:
Melodica: Soprano and/or Alto Melodica made by Hohner (BRD).
Power Supply: LCL150PS24 (150 W 24 V) Farnell order nr. 1738313
Pressure sensor: Freescale MPXV7002DP. Datasheet.
Wheels (4):
Solenoid Valves (25):
Tungsten bulbs (25):
Firmware for the PIC microcontrollers (last updates: 26.11.2022):
Note: for (re)programming the motor controller PIC, it is not required to remove the PCB on the underside. The ICD programming connector can be accessed by putting the robot on its side.
Cost calculation:
| item | nr | details | cost (in Euro) |
| Radial Compressor 24 V | 1 | airflow: 1.23 m3 / minute |
310.00
|
| Hohner Soprano Melodica | 2 | (1 for spare parts) |
100.00
|
| Power supply | 1 | LCL150PD24 |
265.00
|
| Construction steel | 10 kg |
15.00
|
|
| Pull solenoids | 25 | Binder 12V, with return springs |
925.00
|
| Valve control PCB | 1 |
320.00
|
|
| Motor control PCB | 1 |
260.00
|
|
| Freescale pressure sensor | 1 | MPXV7002DP |
35.00
|
| Tungsten Bulbs | 25 | 12 V 60 mA |
10.00
|
| IEC Mains entry, with filter | 1 |
22.00
|
|
| Power switch | 1 | toggle, on-off-on, 12 mm hole. |
32.00
|
| Spoke wheels | 2 | Tente, massive soft polyurethane tires |
70.00
|
| pivoting wheels | 2 | building height 72 mm |
22.00
|
| Galva spray paint | 1 | grey |
20.00
|
| Polycarbonate | 0.5mm2 | 8 mm thick, transparent |
12.00
|
| Bolts and nuts | M12, M10, M8, M6, M5, M4, M3 |
40.00
|
|
| Distance holders | 8 | M3 x 30, M4 x 25 |
8.00
|
| Red paint | 1 | 125 ml |
5.00
|
| Silicon compound | Loctite gasket silicon |
18.00
|
|
| Sn/Pb solder | 5 m |
3.00
|
|
| Wiring | Silicon wire, spirawrap. twin cable |
10.00
|
|
| Muffler (PVC pipes and accesories) | 1 | filled with foam |
12.00
|
| Conical springs | 3 | egg stands for table use |
9.00
|
| Aluminium bars | 2 | massive rectangular cross section bars. |
4.00
|
| soft PVC thread protectors | 18 | 3 mm and 4 mm diameter |
2.00
|
|
2531.00
|
Labor:
29 working days, so far.
Last update: 2025-09-06 by Godfried-Willem Raes