Triltank - RippleTank
Interactive audio art installation
A Logos Production - made on request for Musica and Concertgebouw Brugge
2017-2018
Godfried-Willem Raes, Laura Maes, Lara Van
Wynsberghe, Moniek Darge, Kristof Lauwers & Mattias Parent
This project came into existence in response to a commission by Musica and Concertgebouw Brugge for an installation whereby the vibrations of music -more specifically Beethoven's 9th symphony- could be made visual and/or tactile for deaf visitors. They are encouraged to sing the theme in a microphone thus activating the patterns. By observing the patterns a feedback path to the deaf singers is created. Obviously the project can also be installed for non-hearing impaired audiences/participants as well as in non-interactive modes where the tank can be excited by just about any music. We also used it in combination with our Holosound installation, wherein the patterns can be gesture controlled.
Chladni plate resonators where obviously the first source of inspiration
we got here, but also it reminded us of some compositions by Alvin Lucier
Logos realised in the past at Logos Foundation. To visualize resonance
patterns in Chladni plates, traditionally Lycopodium powder (furn spores
in fact) is used. The Alvin Lucier pieces call for fine white sand. Next
to these materials, for this project we used a one square meter large
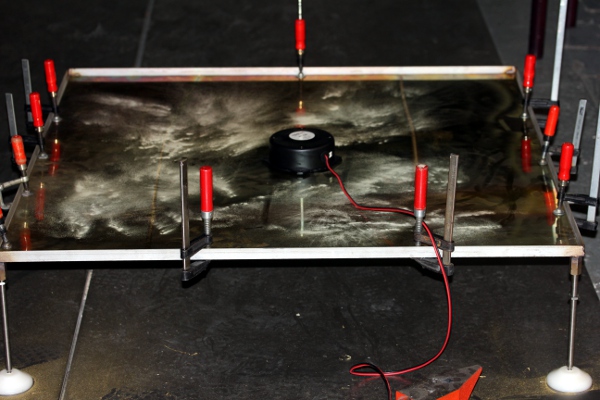
hardened brass plate driven by a powerfull transducer and a layer of liquid
over it. Water can be used but other liquids give different results, depending
on the viscosity of the liquid. The thickness of this liquid layer should
not exceed 10 mm or whatever required to just fill the entire surface
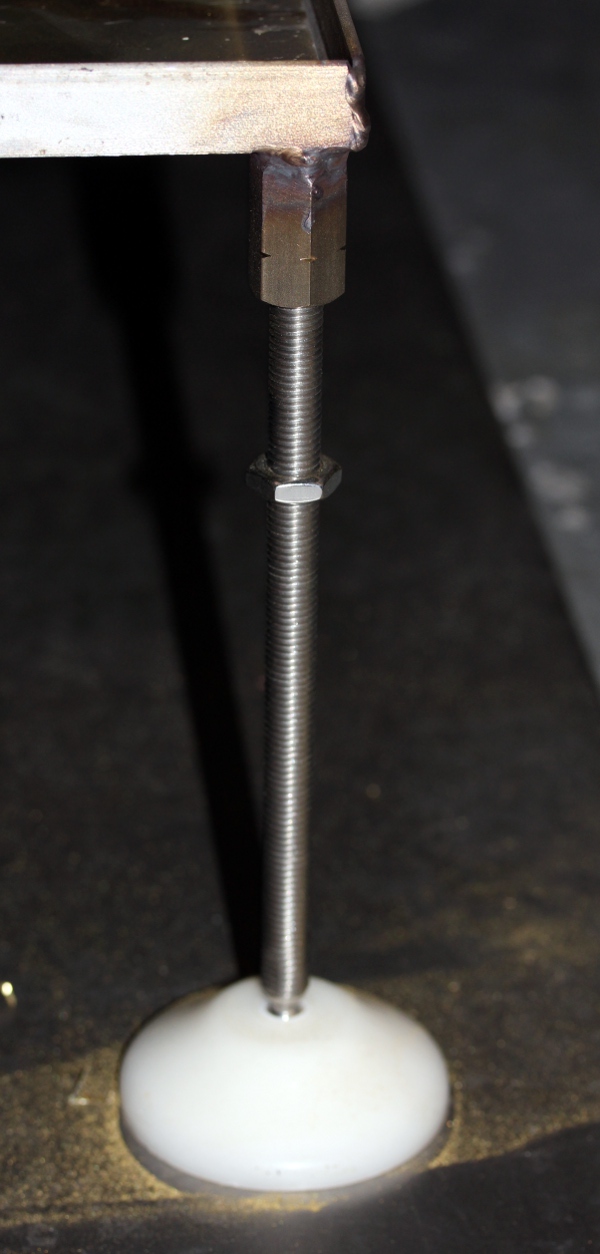
of the plate. The frame should be set up absolutely flat and to that end,
we designed the frame with adjustable stand-offs. The setup looks a bit
like that of a standard rippletank as used for demonstrations of wave
propagation and diffraction in acoustics classes, but here we do not use
a stiff plate but rather a vibrating plate. Thus, here the vibration patterns
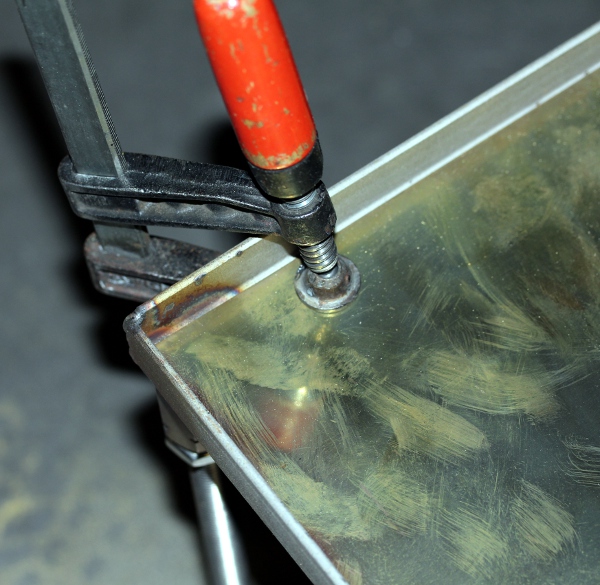
are not longitudinal surface waves, but vertical depth waves. The driver
is mounted on the underside of the tank: 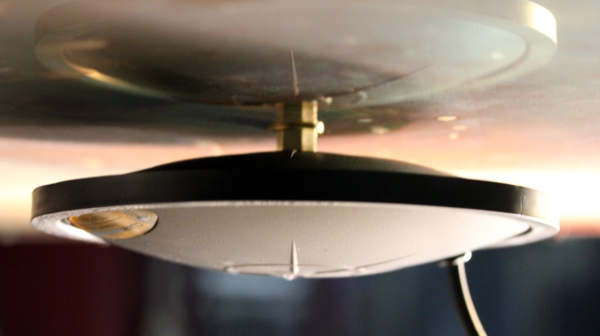
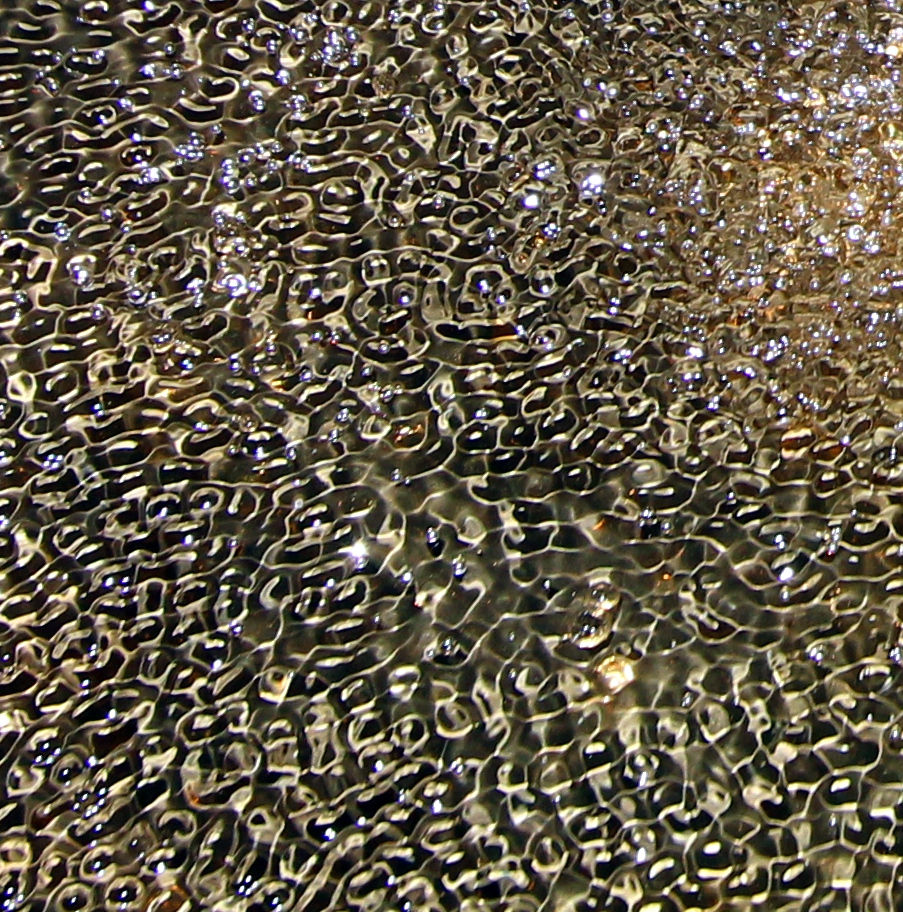
Here are some pictures taken during our experiments with the tank:
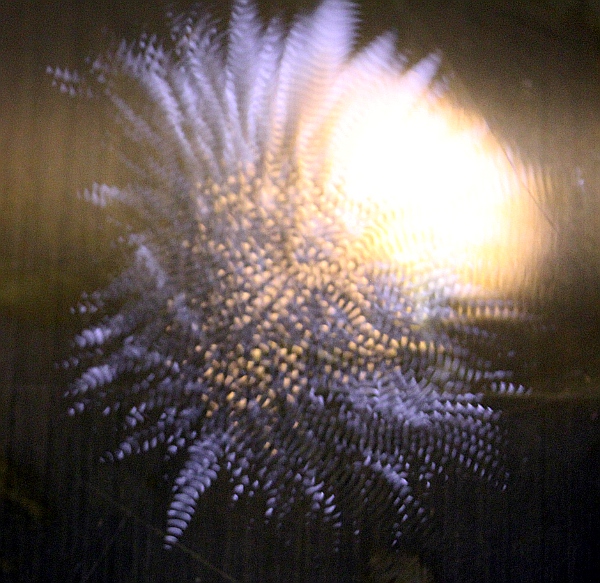
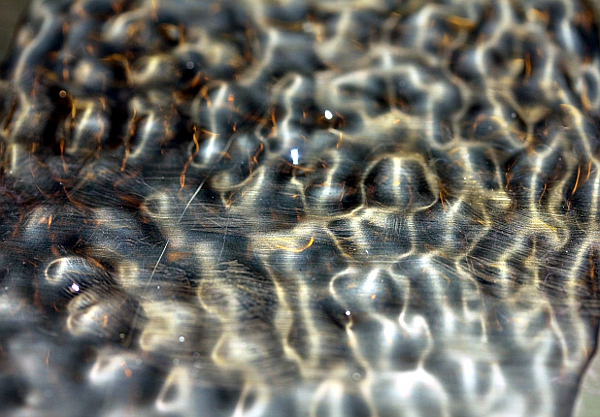
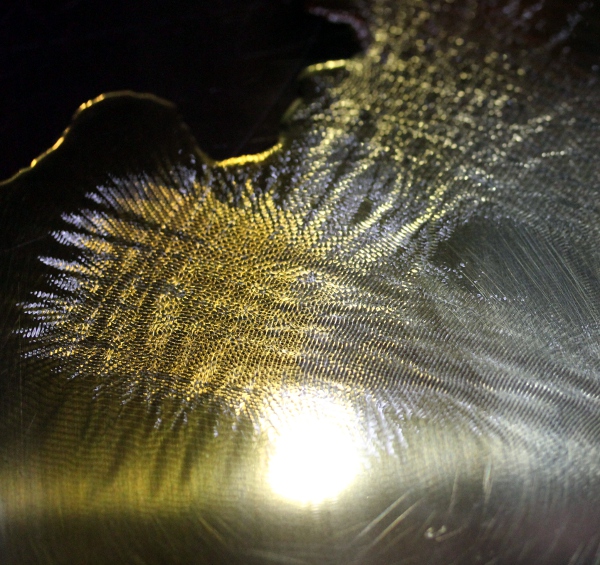
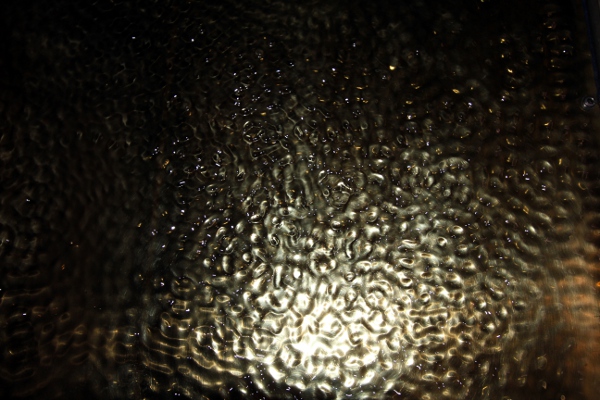
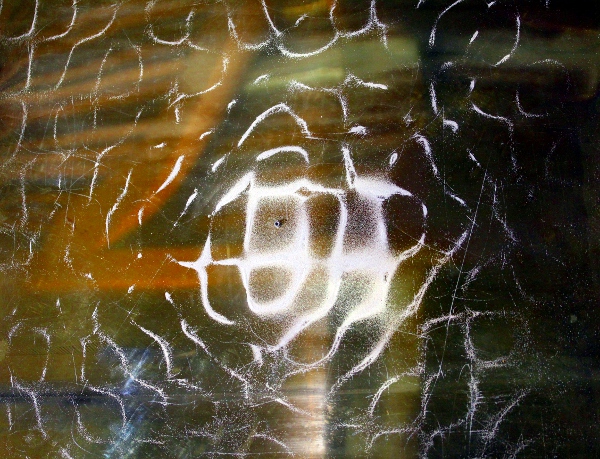
For the pictures above, pure water was used. Following three pictures were taken with fine white sand on the plate:

It is important to keep the brass surface of the plate neatly polished. Placement of a video camera and projection on a large screen is highly recommended. For the lighting, a grazing light should be used. Interactive set ups, where the vibrations can stem from a microphone operated by visitors or workshop participants are perfectly possible. Insertion of a limiter/compressor in the signal path is advised.
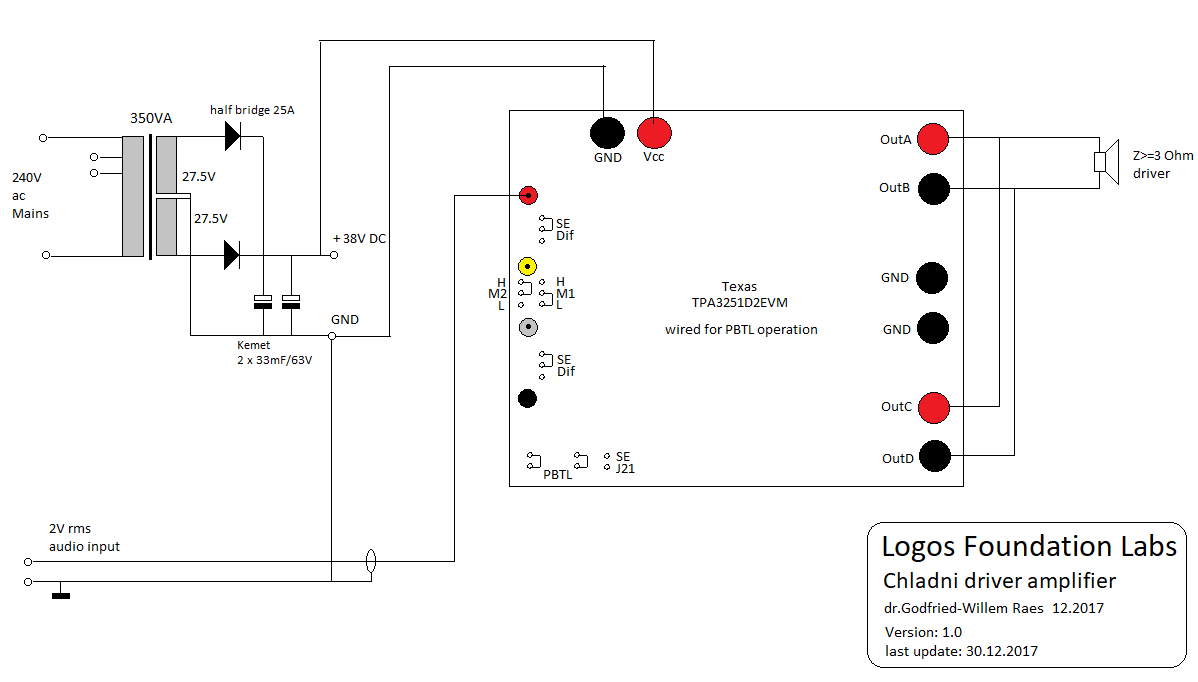
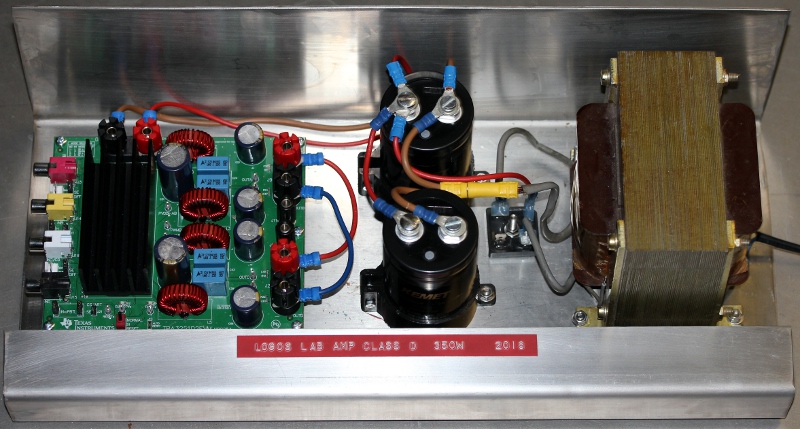
For driving the plate and the driver, a very powerfull amplifier is required, capable of delivering at least 250W into 4 Ohm. We designed a class D amplifier using a TPA3251D2EVM evaluation board from Texas instruments. The power supply for this amp is a classic analog and linear design. thus avoiding spurious signals that tend to result from the use of switched mode power supplies. Here is the complete circuit for the power stage:
And here we see the amplifier, all wired up and working:
The tank, after precize horizontal alligment, should be filled with clean water.
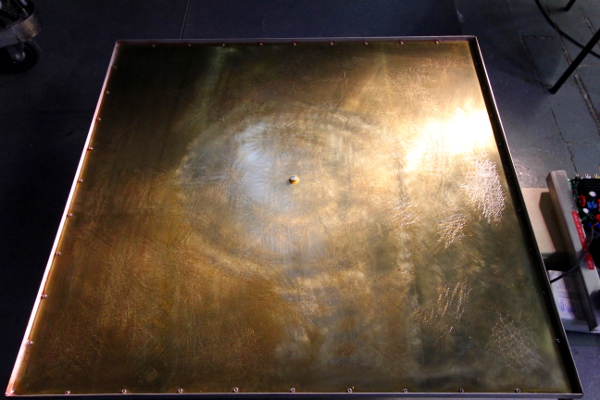
It takes about five liters. Lighting is very important for a good visual appearance and it is advised to use a video camera and a large projection screen to amplify the images appearing on the water surface, particularly of larger audiences have to be coped with. Note that the video frame rate may cause odd interference effects on the projected images. Stroboscope lighting is also possible and leads to quite spectacular 3-D results. The stroboscope should operate at audio frequencies and thus disco-type stroboscopes cannot be used as their frequency range is in general way too low.
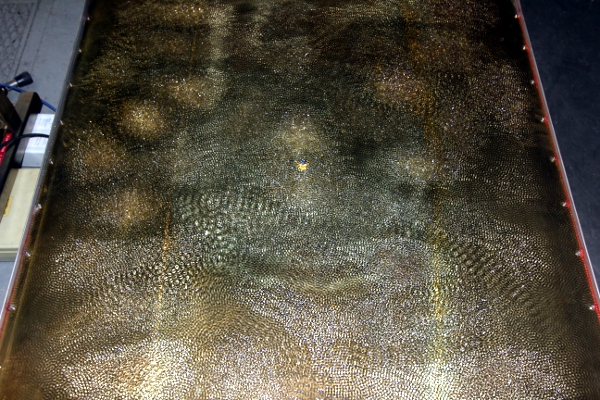
Another possibility leading to quite fascinating results consists in used laser light sources pointed at the surface of the plate. The reflection of the light beam(s) should fall on a screen or a reflective wall. Here are some pictures taken from the vibrating water surface with a HeNe laser:

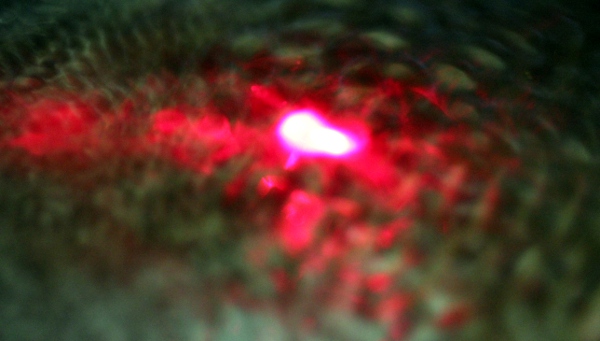
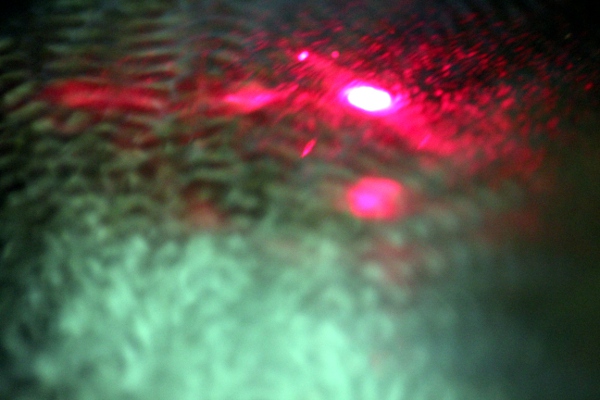
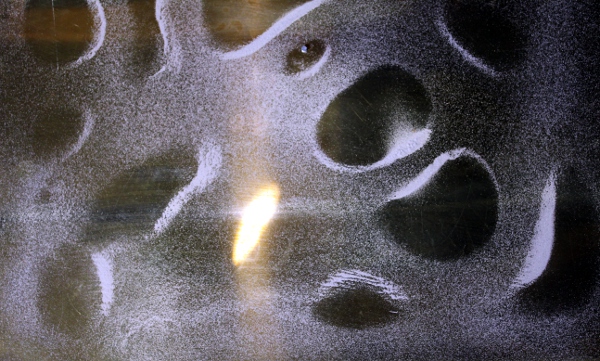
When the excitation level gets very high, tiny water drips start emerging from the surface. They can be seen as the white dots in this picture:
This very flexible project can be transported in a normal car.
Collaborators on the construction of the TrilTank project:
- Mattias Parent
- Kristof Lauwers
- Lara Van Wynsberghe
- Moniek Darge
- dr.Laura Maes
- dr.Godfried-Willem Raes (research and development)
- This project can be rented from Logos for public installations. Feel free to contact us via email.
Installations and performances:
23.01.2018: Try out performance with namuda dance by Emilie
De Vlam and the Logos robot orchestra at Logos Tetrahedron.
24.02.2018: Brugge, Concertgebouw. Workshop sessions with participants
were held two weeks prior to the public presentation.
24.06.2018: Bilzen, Alden Biesen, AlbaNova festival.
Bouwdagboek - Construction diary::
08.12.2017: Discussion of the project with Laura Maes
09.12.2017: First sketches and designs.
10.12.2017: Start construction of a water surface plate. Frame sawn from stainless
steel L-profile 20 x 20 x 3. Overall internal size: 1m2 (1000 x 1000) such that
the standard size of MS58 hardened brass sheet fits exactly. Stand-off's for
exact horizontal placement designed, using M12 threaded machine feet.
These feet should screw into long M12 nuts TIG welded on the corners of the frame.
11.12.2017: Frame welded together, with the M12 long nut on the corners.
12.12.2017: First experiments using Lycopodium spores and thin white sand. This
only works with very low frequencies.
First layer of water applied: this works quite well.

Brass plate mounted on frame, with 36 M4x8 inbus hex bolts (stainless steel) and nuts.
A layer of red Loctite gasket silicone was applied between frame and brass plate.
13.12.2017: Cleanup of the silicones sticking out. Drilling of central 5 mm hole
for a Visaton BS76 driver. Tests using white sand, lycopodium, water, methyl
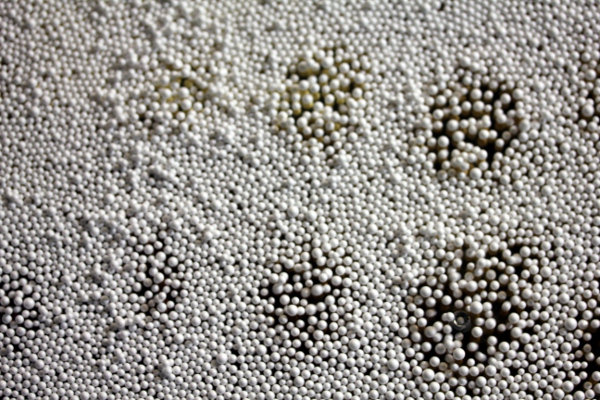
alcohol and styrofoam balls. First series of pattern pictures made.
14.12.2017: Experiments with styrofoam balls:
15.12.2017: Filling the tank with water, revealed we have some leaks in the
corners... Also, in experimenting with higher driving power we exceeded the
20W limit for the Visaton driver and it burned out. Neodymium staff magnets
ordered from Supermagnete.de for designing better drivers.
16.12.2017: Experiment with an industrial AC buzzer, operating on 240V. This
is the pattern obtained when driven at 100 Hz:
Here fine white sand was used. As this driver rectifies the signal, it is less usefull
for audio-display.
17.12.2017: Potentially better drivers traced in the US. Made by Clark Synthesis,
type numbers TST429 and TST329,
both models ought to handle about 135 Watt at 4 Ohm impedance. The frequency
response is said to range from 10Hz to 17kHz. We enquired by mail, but still
awaiting an answer.
26.12.2017: Clark Synthesis driver TST329 prepaid and ordered.
27.12.2017: Design of a class D power amplifier using a texas instruments evaluation
board. Here is the datasheet. The
power supply for this amp can be kept analog and linear, using Kemet 33mF electrolytics.
29.12.2017: Texas TPA3251 came in.
30.12.2017: Suitable power transformer found. Amplifier circuit drawn:
04.01.2018: Payment for the Crown driver came back due to incomplete wire transfer
data on the Crown invoice.
05.01.2018: Difficulties in the payment for the Crown driver seem solved now,
thanks to Laura Maes...
07.01.2018: Plate set up for a demonstration, as yet using a Visaton driver
as the Crown driver didn't come in as yet. We discovered a small leak. To be
closed with silicon after the demo, as it first needs to dry fully. New series
of pattern pictures made.
08.01.2018: Demonstration for Musica and Concertgebouw Brugge. Start construction
of the amplifier chassis. This will be a stainless steel chassis as the components
it has to carry are quite heavy. This is the placement of the amplifier components
on the chassis:
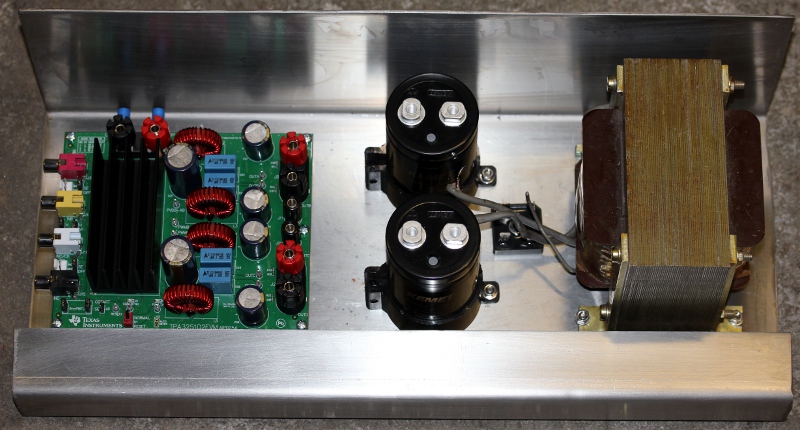
09.01.2018: Wiring of the class D power amplifier. Here it is, all wired up and working:
It is configured for mono operation. The RCA connector to be used for the single ended input is the red one. The power supply voltage at rest with the amplifier switched on is 35 Volts. The vibrator should be connected to the paralled red and black banana plug sockets. Watertightness test on the tank.
10.01.2018: Experiments with laser light projected from the vibrating surface.
12.01.2018: The ordered Clark TST329 transducer came in today. Mounting can
take off.
13.01.2018: ClarkSynthesis transducer mounted on the plate, using a 3/8"
bolt and two brass washers.
Experiments with the class-D amplifier. The results are quite good as it is right now. We
also tried HeNe laser light and found out that this type of vacuum tube laser
performs much better than the semiconductor solid state lasers we also experimented
with. As to the lighting: we recommend using grazing light coming from one or
two profile theatre spotlights. If the walls of the room are clear enough, this
projects image of the moving water surface on the walls creating a complete
emersive environment.
14.01.2018: Design of a power-meter to allow monitoring -and protecting- the
driver.
15.01.2018: Ripple tank setup in the Logos Tetrahedron. We need a pump to easily
remove the water from the tank. Moving, let alone transporting, the tank with
the water is nearly impossible. Lighting experiments with LED spotlights (yellow)
on very low stands.
23.01.2018: Try-out performance with Emilie De Vlam, in a Namuda study with
the Logos robotorchestra.
24.01.2018: Some quick video snippets recorded and added to this site and this
webpage. Also posted on Facebook.
06.02.2018: Purchase of a pump to empty the tank after use.
08.02.2018: The ripple tank went off to Bruges for the workshops with deaf people.
Wokshop animator is Kristof Lauwers.
20.06.2018: Ripple tank polished again. A tedious job performed by Moniek Darge.
21.06.2018: Project tested as it will be presented at Alba Nova this weekend
25.06.2018: operational failure observed at Alba Nova... Extensive tests required.
19.06.2019: Project checked: the failure is in the Clarksynthesis transducer. It certainly has been overloaded. Either we have to replace this one (sold way too expensive...), or we have to design a new one of our own, using a very strong permanent magnet and a fixed coil. We opened the Clark transducer (this is a destructive operation, as the thing is not constructed to professional standards) and noticed it uses a quite strong magnet assembly and a moving coil submerged in ferrofluid.
22.06.2019: Experiment performed with a solenoid and a very strong neodymium magnet. This is quite promissing. However it looks like we will have to wind the required coil ourselves. To get a good frequency response, a large ferrite core would be required.
23-26.06.2019: Further testing of new transducer designs.
12.08.2019: LOD wants to use our plate for a music-theatre production. Thus we have to proceed in making the project fully operational again.
Technical specifications:
Sizes: 1 square meter surface. Height: ca. 200 mm.
Weigth: ca. 15 kg
Power: 230V ac, 300 W max.
Amplifier: TPA3251D2EVM (Texas Instruments), input sensitivity: 2V rms.
Original Transducer: Clarksynthesis, TST329, 4 Ohm, 125 Watt. Thread: 3/8" - 16
(brass).
Alternative transducer: Logos Electronics design, 2019, using moving magnet and coil principles.
Brass plate: MS58 - F51 Hard. (engraving quality), thickness: 0.8 mm.
Frame: Stainless Steel AISI 304, TIG welded.
Design, research and construction: dr.Godfried-Willem Raes
Production: Logos Foundation
Insurance value: 3000 Euro.
Technical notice: The green LED on the amplifier PCB indicates power on. The orange LED, when lit, indicates clipping. The level of the input signal must be reduced until the orange LED stays off. The red LED, when lit, indicated a fault in the amplifier. Generally the cause is overheating end/or overload. Power down and reset after removing the fault condition.
Project cost calculation:
Materials:
| description | purpose | quantity |
cost
|
| Stainless steel L-profile: | construction | 6 m |
30.00
|
| M12 adjustable feet with nylon base | construction | 4 |
100.00
|
| M12 high nuts | construction | 4 |
48.00
|
| MS58 brass sheet (CuZn39Pb3, werkstof 2.0401, ASTM360) | construction | 1 m2 |
164.00
|
| M4x8 cyclinder head, inbus hex + grower and nut | construction | 36 |
36.00
|
| Lycopodium powder | research | 10 g |
5.00
|
| Loctite Red Gasket Silicone compound | construction | 1 |
31.00
|
| 4 mm Cobalt drill bit | construction | 1 |
1.80
|
| Visaton BS76-8 driver, with M5 screw (burned out) | research | 1 |
18.00
|
| Neodymium staff magnets, supermagnete de | research | 3 |
67.50
|
| AC buzzer | research | 1 |
30.00
|
| Farnell Texas TPA3251D2EVM + 33mF Kemet elco's | construction | 1 |
342.48
|
| 350VA Mains transformer | construction | 1 |
162.00
|
| Rectifier 25A | construction | 1 |
14.00
|
| Visaton BS76-8 driver (replacement for demo) | research & demo | 1 |
18.00
|
| Wiring, connectors and soldering | construction | - |
10.00
|
| Crown platinum 350W driver TST329 | construction | 1 |
412.65
|
| UPS shipping for Crown driver | construction | 1 |
82.65
|
| Pump for emptying the tank | accessory | 1 |
230.00
|
| End sum: |
1803.08
|
Labour:
| 10.12.2017: precision cutting of profiles | 2 h |
90.00
|
| 11.12.2017: TIG welding frame | 1 h |
45.00
|
| 12.12.2017: Mounting of brass plate with bolts and nuts. | 6 h |
270.00
|
| 13.12.2017: Clean up of the silicone sticking out (solvent: tetra). First polishing attempt. Experiments with different liquids, sand, powders etc... | 2h |
90.00
|
| 15.12.2017: Experiments with higher power and filled tank | 1h |
45.00
|
| 16.12.2017: Experiments with high voltage AC buzzer | 1h |
45.00
|
| 27.12.2017: Design of a suitable power amp using a Texas evaluation board | 4h |
180.00
|
| 30.12.2017: Calculating and circuit design for power amp. Component selection | 2h |
90.00
|
| 07.01.2018: Set up for demo. Discovered a leak. Repaired with silicon on the underside. | 1h |
45.00
|
| 08.01.2018: Construction of the stainless steel chassis for the power amp | 4h |
180.00
|
| 09.01.2018: Wiring of the power amp components. | 2h |
90.00
|
| 13.01.2018: Mounting of the transducer. New leakage testing session. | 1h |
45.00
|
| End sum: | 26h |
1215.00
|
Total project cost: 3018 Euro.